
Wie können wir helfen?
How to Add Language Packs to Windows 11/10 ISO Image (Offline)
The process of adding new updates or features to a pre-existing Windows setup media is known as Slipstreaming. Using this method, you can keep your existing ISO images updated with the required language packs.
Link: https://www.itechtics.com/add-language-packs-windows-11-10-iso/
Download and install Windows Assessment and Deployment Kit (WindowsADK)
WindowsADK is a tool used to aid in the deployment of Windows OS in bulk, or on a large number of devices.
To learn more about WindowsADK, refer to this blog post.
You can also download and install WindowsADK through the guide provided in the post. We suggest that you do so before proceeding forward to the next step. This is because WindowsADK provides certain elements that are required to push the language packs into existing ISO images, such as the “Windows Kits” folder that can be found in C:\Program Files (x86).
Copy files from windows 10 (11) to an empty folder. We have extracted the image to D:\Extract\. Once done, you may now proceed to the next step.
Determine image Index Number
Usually, an ISO image contains multiple editions of the same Windows, such as Professional, Education, Home, etc. Each of these editions has its own index number. An index number is an integer associated with each of these editions, which is required later when updating the ISO image with new language packs. Hence, we must determine the index number for the edition you will be deploying in the future using this ISO.
Launch the Comand Prompt with Administrative privileges and type this command:
Dism /Get-ImageInfo /ImageFile:<PatchToExtractedFolder>\sources\install.wim
Mount .WIM file using DISM
The next step is to mount the extracted Install.wim file to an empty folder so that changes can be applied to it.
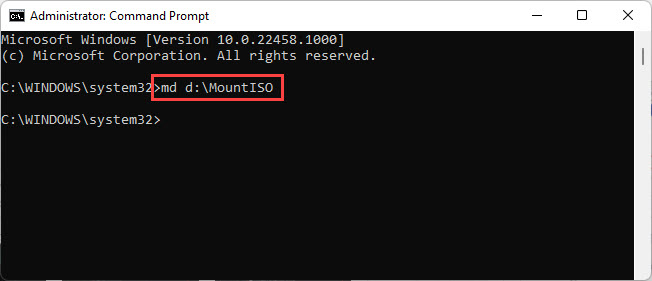
- Create a new, empty folder where the ISO will be mounted:
md <PathToNewFolder>
Replace<PathToNewFolder>with the complete path where you wish to create an empty folder. Here is an example where we created a folder named “MountISO” in the root of the D drive: - Next, you need to mount the install.wim file to this folder. For that, use the command below:
DISM /Mount-Wim /wimfile:"<PathToExtractedFolder>\sources\install.wim" /index:<IndexNumber> /mountdir:"<PathToNewFolder>"
Here is an example of the command, where we replaced<PathToExtractedFolder>with the complete path to where the ISO is extracted,<IndexNumber>with the index determined in the last phase, and<PathToNewFolder>with the complete path to the empty folder just created in the last step.
Add language pack(s)
You should now be able to add language packs to the mounted .wim file. However, you must first download the .cab files for the language packs that are right for your operating system. You can download them from the internet directly.
Once downloaded, proceed with the command shown below to mount the language pack(s) to your ISO:
Dism /Image:"<PathToNewFolder>" /Add-Package /PackagePath="<PathTo.CABLanguagePack>"In the command above, replace <pathToNewFolder> with the complete path with the folder you had created earlier (to which the .wim file is mounted) and also replace <PathTo.CABLanguagePack> with the complete version of the downloaded language pack. Here is an example:
 11")
You can now continue to add as many language packs as you like. Remember that more language packs mean the larger the footprint of the operating system.
Commit and dismount
Once the language packs have been incorporated into the .wim file, all that is left to do is save the changes and then dismount the install.wim file. Use the command given below to commit the changes and dismount.
dism /Unmount-wim /mountdir:"<PathToNewFolder>" /commitReplace <PathToNewFolder> with the complete path of the folder where install.wim file is mounted. In our case, we will be using the following command:
dism /Unmount-wim /mountdir:"D:\MountISO" /commitNote that this may take a few minutes and the Command Prompt may look like it is stuck. However, that is not the case. Please allow a few minutes to commit and dismount successfully.
 12")
Covert extracted folder back to ISO image
You may now convert the updated Windows files and folders back to an ISO image using third-party tools. Here is a guide on how to convert files and folders into ISO images.