
Wie können wir helfen?
Linux Mint Befehlen & Apps
In Terminal in Ordner wechseln, zum Beispiel in Downloads Ordner: ~/Downloads
Beispiel Datei löschen: sudo rm /etc/apt/test.key
GParted = ist ein Partitionierungs Applikation (kann direkt über Anwendungsverwaltung installiert werden)
Winbind = sudo apt-get install winbind
Wine installieren:
https://gitlab.winehq.org/wine/wine/-/wikis/Download
Installieren winetricks: (Für Win Apps installieren)
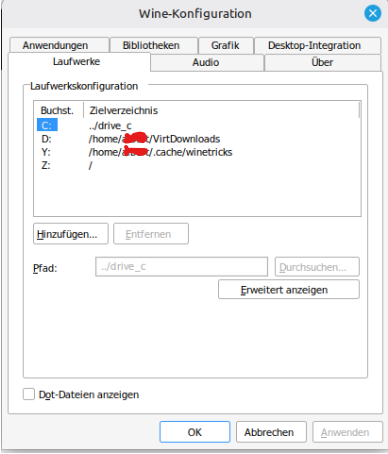
Hier können wir ein Laufwerk erfassen. Ich habe zum Beispiel D: Lauferk für den Ordner VirtDownloads erfass.
In diesen Ordner speicher ich die Daten und Apps welche ich installieren möchte.
Wineprefix on 64 bit : Artikel: https://askubuntu.com/questions/177192/how-do-i-create-a-32-bit-wine-prefix
- You can create a new 32 bit wineprefix using the WINEARCH environment variable. In a terminal, type: WINEARCH=win32 WINEPREFIX=/path/to/wineprefix winecfg.
- Then whenever you want to run a program in the new prefix, add
WINEPREFIX=~/.prefix-namebefore the wine command. - To create a 32-bit WINE prefix on a 64-bit Ubuntu system, you need to open a terminal and run the following command:
WINEPREFIX="$HOME/prefix32" WINEARCH=win32 wine wineboot
WhereWINEPREFIXis the directory for the prefix
This directory must not already exist or you will get an error! Please do not manually create it in Nautilus or with mkdir./
If not working then try this:
- Just creating a
wine32prefix/directory (withoutwine64prefix/directory) will not work. As was suggested above (but not fully written out) – and if you want to avoid the need to use winecfg (which is annyoing in automation – you need to somehow close it), here is the full solution: create awine64, then awine32directory. If you usewinetricksto check it (it gives a warning forwine64directories), it will report both correctly (wine64gives the warning, since it’s 64, wine32 does not, since it’s 32.). The solution; rm -Rf ./wine # carefull, this deletes your entire wine config (fine if you want to start afresh) WINEPREFIX=~/.wine wineboot- Wait……
WINEPREFIX=~/.wine32 WINEARCH=win32 wineboot- After this, you can:
WINEPREFIX=~/.wine32 WINEARCH=win32 your_32bit_executable.exe WINEPREFIX=~/.wine WINEARCH=win64 your_64bit_executable.exe - Test if you already have multiarch enabled:
dpkg --print-foreign-architectures | grep -q i386 && sudo dpkg --add-architecture i386- Then install wine32:
sudo apt-get update && sudo apt-get install wine32- And finally, don’t delete your 64-bit wine install. just rename it to .wine64 then create a new .wine folder for your 32-bit apps:
mv ~/.wine ~/.wine64 && WINEARCH=win32 wineboot
I was running into the same issue.
Type WINEARCH=win32 WINEPREFIX=~/.wine winecfg
It should start to download the drivers necessary. I believe this issue is due to a problem occurring during the normal download. For me it my internet dropped as it was originally downloading the drivers.
After erasing .wine32, installing the .NET 4.0 with the command $ WINEPREFIX=~/.wine32 winetricks dotnet40, worked for me.
So starten wir ein Software Installation:
- Starten wir den Terminal
- wine VirtualDownload/Office2007/setup.exe (Damit installieren wir jetzt Office 2007)
PlayonLinux = ein Applikation für Windows Apps (kann direkt über Anwendungsverwaltung installiert werden)
- Installation: Terminal starten. Geben Sie folgenden Befehl ein:
sudo apt update && sudo apt install playonlinux
Smart IPTV installieren:
Terminal öffnen:
sudo apt update ; sudo apt install snapd
Install IPTV Smarters Expert: sudo snap install iptv-smarters-expert
Netzwerkverbindug auf Windows Share:
Was brauchen wir:
Das Applets „App Launcher“
Klickt auf eine leere Stelle in der „Taskleiste“ und wählt dort Applets aus. Sollte es nicht unter „Verwalten“ zu finden sein, dann ladet es dort unter „Herunterladen“ herunter. Aktivieren könnt ihr es dann mit einem Klick in dem Fenster auf den Plus-Button.
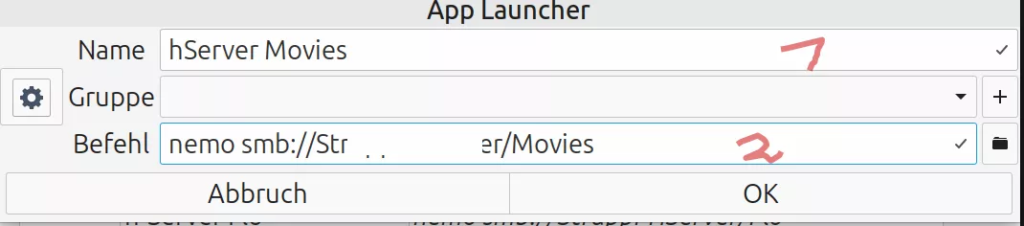
- Jetzt Rechtsklick auf den neu angehefteten „Launcher“ in der Taskleiste – sofern das Fenster noch nicht offen ist und wählt die Option „Einrichten…“
- Klick auf den Plus-Button am unteren Rand des Fensters
- In dem Fenster gebt ihr oben bei der roten Eins der Verknüpfung einen Namen
und bei 2 die Adresse, unter der der im Netzwerk freigegebenen Ordner.
Teams für Linux
https://github.com/IsmaelMartinez/teams-for-linux
Debian/Ubuntu:
sudo mkdir -p /etc/apt/keyrings
sudo wget -qO /etc/apt/keyrings/teams-for-linux.asc https://repo.teamsforlinux.de/teams-for-linux.asc
sh -c ‚echo „Types: deb\nURIs: https://repo.teamsforlinux.de/debian/\nSuites: stable\nComponents: main\nSigned-By: /etc/apt/keyrings/teams-for-linux.asc\nArchitectures: amd64“ | sudo tee /etc/apt/sources.list.d/teams-for-linux-packages.sources‘
sudo apt update && sudo apt install teams-for-linux